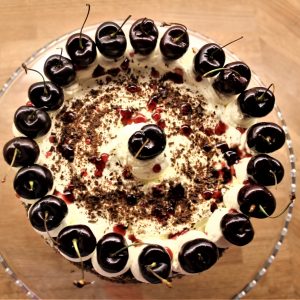
Gluten-free Black Forest Gâteau
Considered somewhat of a retro dessert/cake, we think that the Black Forest gâteau should make a proper comeback as it really is an absolute joy to eat! Imagine chocolate sponge, cherries, booze and freshly whipped cream and I defy you not to start licking your lips and checking your cupboards for all the ingredients needed to make our gluten-free Black Forest gateau 🙂 Typically, a Black Forest gateau has at least three to four layers but ours has just two because this way you spend less time baking/assembling and more time savouring/devouring your gateau masterpiece! If you would like more layers, you can split and fill each of your chocolate sponges – but you may need more cherries and cream than our recipes requires.
Ingredients
For the chocolate sponges…
- 210 g caster sugar
- 1 tsp vanilla extract
- 5 large eggs
- 45 g cocoa powder
- 80 g Magical gluten-free plain flour
- 75 g butter, melted
- 50 g Stork for baking (tub)
For the Kirsch syrup…
- 75 g caster sugar
- 75 ml water
- 2 tbsp kirsch
For the filling/covering…
- 1 jar black cherries in kirsch (I use the Opies brand)
- 1/2 jar black cherry jam
- 600 ml double cream
- 60 g caster sugar
- 20 ml kirsch
To finish…
- 100 g dark chocolate, grated/shaved
- 12-16 fresh dark cherries
Instructions
For the chocolate sponges…
- Heat your oven to 180c / 160 fan / gas 4. Grease and bottom line two 20cm (8") sandwich tins.
- Melt the butter and Stork together in a bowl and set aside to cool.
- Put the eggs, sugar and vanilla extract into the bowl of a stand mixer and beat with the paddle attachment for approximately eight minutes until glossy, thickened and the mixture leaves a trail when you lift up the paddle.
- Sift the cocoa powder and flour over the top of the egg mixture and then carefully fold through with a metal spoon or silicone spatula until all the flour and cocoa is incorporated.
- Pour the cool melted butter into the bowl and gently stir until it has all been combined into the cake batter.
- Divide the chocolate cake batter between your two cake tins and bake in the oven for 22-25mins until the cakes are cooked through, springy to the touch and have shrunk away from the sides slightly (ours took the full 25 minutes).
- Leave in the tin to cool for five minutes and then carefully turn the sponges out onto a cooling rack until cold.
For the kirsch syrup…
- Put the sugar and water in pan and heat to dissolve the sugar, stirring occasionally. Bring to the boil and leave on a rolling boil for three minutes. Take off the heat and leave to cool.
- Stir through the kirsch.
For the kirsch cream…
- Pour the cream into the bowl of a stand mixer, add the sugar and whip together (using the balloon whisk attachment) until the cream holds firm peaks. Fold through the kirsch.
Assembling your gluten-free Black Forest gateau…
- Grab your serving plate or cake stand, put a little blob of jam in the middle and place your first chocolate sponge on top. Brush the top of the sponge with half of the kirsch syrup.
- Spread the cherry jam over the sponge, stopping just short of the edge.
- Drain the cherries in kirsch, slice in half and then place all over the top of the cake, stopping around 1cm from the edge.
- Decant the whipped kirsch cream into a disposable piping bag with the bottom snipped off (to create a 1cm hole). Pipe a rim of cream all the way around the edge of the sponge then blob more cream across the top of the cherries. Carefully smooth out the blogs of cream across the cake with a palette knife or the back of a spoon. Do this with a sweeping motion without lifting the knife to prevent the cherries coming up with the knife! You should use rougly 1/3 of the total cream for this stage.
- Brush the second sponge with the remaining kirsch then carefully place it (syrup side down) on top of the first cake.
- Coat the entire outside of the cake with a thin layer of cream – it doesn't need to be desperately neat – and then stick the dark chocolate shavings to the cream (we find the easiest way to do this is to place some shavings onto the palm of our hand and then quickly press them to the side of the cake. Chill the shavings first if, like us, you have hot hands!)
- Finally, pipe cream rounds around the outside edge of the top cake then fill the space in the middle with the remaining cream and smooth out with the back of a spoon. Sprinkle any remaining chocolate shavings over the cream and then place your fresh cherries on each of the rounds of cream. Finish with a drizzle of warmed cherry jam for an additional splash of colour.
- Et voila…gluten-free Black Forest gateau. Enjoy!xx Millie, Marcus, Milo, Maddy and Me xx
Notes
If you can’t get hold of cherries in kirsch, you can soak fresh cherries in booze yourself – do this the day before you are going to make your cake (and don’t forget to pit them before adding them to your cake!
We create chocolate shavings using a potato peeler. Simply ‘peel’ the edge of a chocolate bar to get the shavings. If you have hot hands, chill the chocolate first and return the bar to the fridge for a short while if it starts to get warm.
This cake needs to be kept in the fridge because of the fresh cream. It should last for 4-5 days (ha ha!) and does actually taste better on day two as the flavours mature – not that we are suggesting you sit and look at it for a day before getting involved 🙂
SHOW US YOUR BAKES!Mention @thelittlebakeryofhappiness or tag #thelittlebakeryofhappiness in your Instagram pics so that we can coo over your masterpieces!