
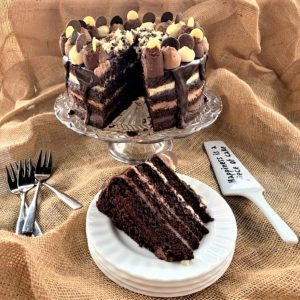
GLUTEN-FREE TRIPLE CHOCOLATE MOUSSE CAKE
A super indulgent gluten-free chocolate cake with layers of dark, milk and white chocolate mousse (whipped ganache), a chocolate fudge icing and chocolate curls. If you like chocolate, you're going to love this cake! The great thing about this recipe is that you can adapt it according to the time you have available and your chocolate preferences. Don't like white chocolate? Leave it out and make more milk chocolate mousse. Not enough time to make three different types of chocolate mousse? Pick your favourite and make three times the amount 🙂 This recipe uses one pack of our Bake Yourself Happy at Home® gluten-free chocolate cake mix, which you can buy for national delivery.
Ingredients
- 1 pack gluten-free chocolate cake mix
- 640 ml double cream
- 205 g dark chocolate
- 100 g milk chocolate
- 100 g white chocolate
- 20 ml golden syrup
Instructions
- Bake the gluten-free chocolate cake according to the instructions on the pack.
- While the cake is baking, make your three types of chocolate mousse. You will need three separate bowls. The method is the same for the three different types of mousse. FOR THE DARK CHOCOLATE MOUSSE Weigh 90g chocolate (chopped) and 100ml cream into a microwave-proof bowl, give it a quick stir then heat in the microwave in short blasts (20s) to melt. Stir in between each blast. When fully melted, add another 100ml cream, stir through then place the bowl in the fridge to chill for a minimum of two hours. FOR THE MILK CHOCOLATE MOUSSE 100g milk chocolate and 100ml cream – follow the same process as above. FOR THE WHITE CHOCOLATE MOUSSE 100g white chocolate and 80ml cream – follow the same process as above but for the second addition of cream, use only 80ml.
- When the cake is baked and cooled, slice each cake in half horizontally. The trick to an even slice is to press a long sharp serrated-edge knife into the side of the cake and then *move the cake, not the knife.*Place one hand on top of the cake on the cooling rack and with the other hand, press your knife into the side of the cake, halfway up. Now turn the cake with your hand, keeping the knife level and still. Keep turning the cake until you are back to the beginning and then repeat the process, gently pressing the knife into the centre of the cake until it has cut all the way through. Set the sliced cake to one side while you make your chocolate fudge icing.
- For the fudge icing, weigh 115g dark chocolate and 80ml cream into a microwave-proof bowl. Stir then heat in short 20s blasts, stirring in between, until the mixture is comletely melted. Stir in 20ml golden syrup. Set aside while you whip the mousse and assemble the cake.
- Remove the chocolate/cream bowls from the fridge and, taking each in turn, whip the mixture with an electric whisk / in the bowl of a stand mixer with the balloon attachment / by hand with a balloon whisk. You are aiming for a consistency similar to whipped cream – sturdy and spreadable but still soft and silky. If you whip the dark chocolate mousse first, followed by the milk chocolate mousse, you can use the same bowl/beater without having to wash them up. You will then need to wash up (and dry completely) the untensils before whipping the white chocolate mousse.
Assembling the cake…
- Grab your cake stand, smear a small blob of chocolate mousse into the centre, then carefully transfer your first slice of chocolate cake onto the stand. Spread 2/3 of the dark chocolate mousse evenly across the cake, right up to the edges. Place the second slice of cake on top of the mousse. Now spread 2/3 of the milk chocolate mousse, as above. Add the third layer of cake, spread 2/3 of the white chocolate mousse, then place the final layer of cake on top. The chocolate fudge icing you made earlier is now ready to spread across the top of your cake. It should have cooled slightly but still be pourable. Pour it over the top of the cake and spread it to the edges using the back of a spoon. It should randomly drip down the side of the cake
- Use the remaining 1/3 of each chocolate mousse to decorate the top of your cake with alternate blobs of dark, milk and white chocolate mousse around the edge using a disposable piping bag with the end snipped off. If you don't want to do this, use up all the mousse for each of the layers instead. Finally, for that extra little bit of chocolate indulgence, scatter triple chocolate curls across the centre of the cake (you can buy little tubes of these in most supermarkets).Happy baking and eating! 😍 xx Millie, Marcus, Milo, Maddy and Me xx
SHOW US YOUR BAKES!Mention @thelittlebakeryofhappiness or tag #thelittlebakeryofhappiness in your Instagram pics so that we can coo over your masterpieces!


